
Working with Virtual Machines is a must in today’s world in my opinion. Having a containerised system, with controlled access to the outside world, makes things super easy to test and develop with.
My workflow typically consists of 2 virtual machines at any one time:
- PLC Simulation VM
- SCADA Development / Testing VM
These two VMs are run in parallel in my development laptop, or on a dedicated server, and can be suspended, rolled back to previous states, and generally messed about with without any major worry of loss of work.
When you start tying VMs in with PLCSIM Advanced and a VPN Gateway, things start getting really interesting.
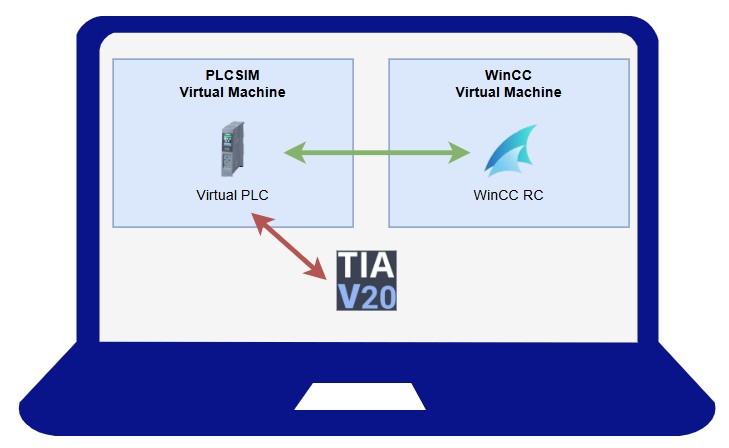
My typical set up is shown above:
- Host Laptop
- PLCSIM Virtual Machine
- Virtual PLC
- WinCC Virtual Machine
- Runtime & Configuration
- TIA Portal
- PLCSIM Virtual Machine
This environment allows me to develop as if I’m developing against a real PLC (there really isn’t any difference, especially if IO simulation is done properly), with a full SCADA. I can check things like:
- Hardware Configurations
- OPCUA Servers working correctly
- Communication profiles correctly configured
- Protocols such as Modbus are working correctly
- Essentially anything that uses the Ethernet ports – as these are available through the PLCSIM Advanced
- Full Software Checks
- My entire project can be developed against the PLCSIM Advanced Virtual PLC
- Using Simulation Mapping (something I go over a lot in posts, courses etc), I can simulate every single input into my system, including those that come from messages or VSDs
- SCADA Integration
- Because the SCADA system is in its own Virtual Machine, we must use normal communication protocols. These will be the same ones that are used in the field, therefore verifying that they will work.
- AS-Read for Tag generation is available, directly from the PLC or through the SIMATIC Export Tool and all tags can be checked that they work correctly against the Virtual PLC, before attending site.
- Trending, Archiving, Alarms… all can be checked against the Virtual PLC
All of this can be done locally, wherever you and your laptop are. It’s a portable development environment that needs no outside resource. This is perfect for working out of the office or remotely.
Using VPN Gateways, such as a Secomea, the setup can be taken even further:

This allows me to work remotely, without the heavy resource requirements to run 2 simultaneous VMs, and connect to an office-based server (or even just a laptop running the VMs) and connect to the Virtual PLC / SCADA.
This approach allows collaborative working too… Pair it up with a Version Control System such as GIT or Version Dog and entire teams can work easily on the same projects, sharing the same resources.
Where To Start
Below is a guide on how to set this environment up yourself.
📝Note
It’s assumed that you already have a PLC project and WinCC project to load into the VMs. If you don’t, that doesn’t matter, but you’ll have to create a PLC and WinCC project that have some meaningful connection in order to test communication works correctly
VirtualBox

A popular Virtual Machine client that houses and runs your machines.
You can download the latest version here:
https://www.virtualbox.org/wiki/Downloads
Getting Started

Once you’ve downloaded VirtualBox, you can begin by creating your first Windows Virtual Machine. This is pretty straight forward, but there’s a few things you need to do first…
- Obtain a valid Windows Installation ISO file
- This is the first hurdle you’ll encounter as nearly all of the ISO files from Microsoft want a licence key to evaluate which version to install, which is something we won’t have (we don’t want or need a licence for a VM because we’re not looking to personalise the machine, or make it any more secure than it is by default).
You can obtain an installation ISO from many different places outside of Microsoft, a simple google search and download from a reputable site will do the trick.
- This is the first hurdle you’ll encounter as nearly all of the ISO files from Microsoft want a licence key to evaluate which version to install, which is something we won’t have (we don’t want or need a licence for a VM because we’re not looking to personalise the machine, or make it any more secure than it is by default).
- Once you have your ISO file, go ahead and select it in the Create Virtual Machine window where the ISO Image field is. If you have a Multi-Edition ISO, you can also select the Edition below.
- Ensure the Type, Subtype and Version match the ISO correctly.
Once the above is done, give the VM a Name, for example: Blank Windows 11

In the Hardware section, give the VM some resources from your Host machine (it might look a little different to the above)
📝Note
PLCSIM Advanced will utilize an entire core per PLC instance, so don’t under-resource that particular VM!
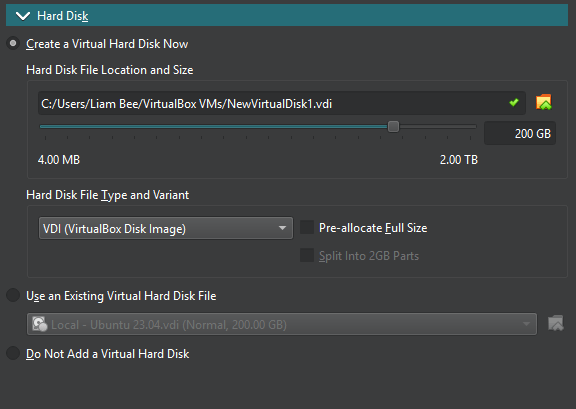
In the Hard Disk section, ensure you give enough Virtual Hard Disk space for Windows and anything else you want to install. This is dynamically allocated as required, up to the maximum size defined.
Go ahead and create the Virtual Machine, it will be set up pretty quickly and ready to run.
First Run

Once your VM appears in the list of VMs in VirtualBox, simply double click it to launch it. On first load, it should load the Windows ISO and install windows. You can ignore any signing in to Microsoft, any product licences and anything else Microsoft tries to get you to do outside of the basics (like keyboard setup etc)
📝Note
Remember you will NOT be able to change your username once you’ve set it up, because you won’t have a Windows licence. Personally, I set all my VMs to the same Username / Password combination such that things are really easy. My security is on the host, so I need not worry about the VM.
Once your new VM is up and running, it’s a good idea to install anything that you might need in any future VM, such as:
- GIT
- Notepad++
- Teamviewer
- Google Chrome
This is because this Blank Windows 11 VM will be Cloned to be used as a Base VM for any future ones. This avoids the issue of having to install Windows every time.
Creating A PLCSIM Virtual Machine

Now that you have a Blank Windows VM, we can Clone it to create a start point for a new VM, which will ultimately become the PLCSIM Advanced VM to host the Virtual PLC
Cloning is easy and is done in VirtualBox:
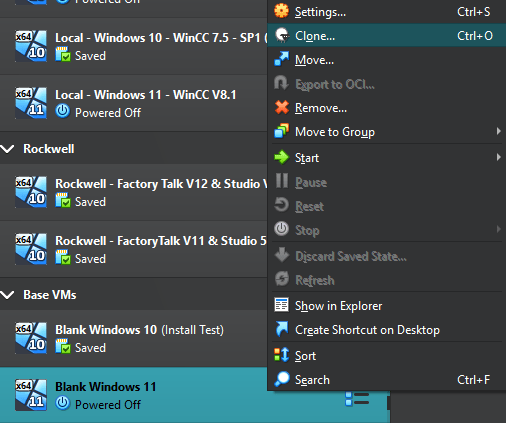
Right-click the Blank Windows VM and select Clone to get started
A dialog box will open, there are a few things here that are needed to be correct else we could have some issues with the VM later…

The Clone Virtual Machine dialog box should be set up exactly how the clone is needed from the get-go, but make sure that it does look the same as above. You don’t want a Linked Clone. Whilst Linked Clones can save on resources in the host, they can become problematic when more than one is run at the same time, or the underlying linked resources are changed. Let’s keep things problem free by having a Full Clone
Once the clone is complete, the new VM will be ready to launch. Go ahead and start it up, it will look exactly the same as the VM you just cloned.
Creating A SCADA Virtual Machine

The process for creating the SCADA virtual machine is exactly the same as the PLCSIM machine.
- Clone the Blank Windows VM
- Rename to something like Windows 11 – WinCC 8.1
Once this is complete, you’ll have a second VM ready to install WinCC for your SCADA purposes. The login information will be the same as the Base and PLCSIM VMs.
PLCSIM Advanced Install / Setup
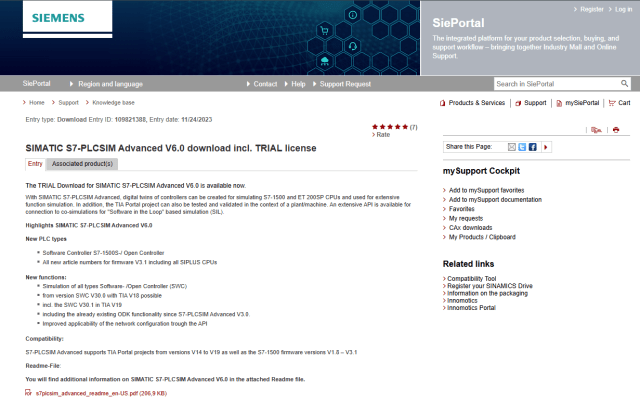
Fire up the PLCSIM Advanced VM that you cloned earlier and head to Siemens Website to download a trial version of the PLCSIM Advanced software.
You can pick whichever version you need / want, the one pictured above is V6.0 – https://support.industry.siemens.com/cs/document/109821388/simatic-s7-plcsim-advanced-v6-0-download-incl-trial-license-?dti=0&lc=en-GB
📝Note
You’ll still need a full licence for your VM! A 14 day trial is included with the download, and yes, you could snapshot the VM before running and keep re-using the trial, but management of the persistent files can become impractical having to do that all the time. A licence is best.
Once the file has downloaded, go ahead and install PLCSIM Advanced. Once it’s complete, and you’ve restarted the VM, you’ll be able to launch it.
Setting Up A Virtual PLC

Creating a new instance of a PLC is easy, but there are a few things that we need to consider before jumping in.
Remember, this is a Virtual Machine, and our TIA Portal software is running on the Host laptop, which is outside of the VM… This means we cannot use the PLCSIM online access and we must use the TCP/IP adaptors. This is so that the outside world can see and access the Virtual PLC, so TIA Portal and WinCC can connect to it (as if it were a real PLC)
In order to make use of the TCP/IP adaptor, we need to make sure that the VM‘s Network Adaptors are correctly set up…
Configuration Of VM’s Network Adaptors For PLCSIM Advanced

In order for the PLC to be accessible, the VM needs to expose itself to the same network that the Host machine is running on. Using a NAT configuration is not good enough, as TIA Portal will not be able to discover the PLC
📝Note
You can still use a NAT configuration for general internet access though, that is fine.
In the Devices –> Network section of the VM menu when running, or the Settings –> Network section of the VM menu when not running (in VirtualBox), you’ll find the above settings for network adaptors.
In this case, Adaptor 3 is configured as my Bridged Adaptor to my Ethernet Connection. This is the connection on which my Host machine is connected to my home/office network. I want my PLC to accessible on this network so it can be seen by any device on the network.
You can use any adaptor, but you must have one configured as pictured above (the name of the Ethernet connection may vary, or if you use WiFi you can use that instead)

In the Network Connections settings, find the adaptor that you set up in the VM adaptor settings, in this case, Ethernet 3.
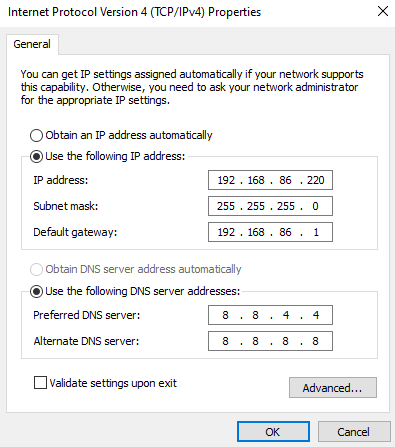
In the TCP/IPv4 properties, set the IP address to a free address on the subnet your host laptop is on. If you want to provide internet access, you’ll need to add the Default gateway to your router too, and appropriate DNS server address (the ones pictured should be fine)
Once the above is set up, we should be OK to create a PLC.
Creating A PLC Instance

Creating a PLC instance is quite straight forward
- Ensure that the Online Access is set to TCP/IP Single Adapter and the TCP/IP communication with is set to the Bridged Adaptor configured in the VM
- Expand the Start Simulated PLC Instance pane and fill in the details. Give the PLC a meaningful name and set the IP Address to a free one on the same subnet as the host and VM. (You don’t really need to worry about the gateway)
- Click Start to add your PLC into the Active PLC Instance list
You should end up with the PLC looking something like this

Checking The PLC Is Accessible

In a Command Prompt use Ping <ip address of PLC> to verify that the host can reach the PLC. As long as you see a response, the PLC is accessible from outside of the VM and is sitting on the network just right.
We’ll come back to this once we have our WinCC VM set up.
Installing WinCC

Just like the PLCSIM Advanced install, WinCC can be downloaded on a trial licence from Siemens here:
https://support.industry.siemens.com/cs/document/109977356/wincc-v8-1-trial-version?dti=0&lc=en-GB
The download consists of multiple parts, so make sure you download all of them and then run the installer from the first download in the list.
📝Note
Don’t forget that you should be downloading and installing this in the WinCC Virtual Machine
Once WinCC is set up and installed, we can start checking that the WinCC machine can see the PLC. The first thing to do is to configure the Virtual Machine Network Adaptors, the same way we did for the PLCSIM Virtual Machine – Can’t remember how? Click here
Checking The Network Connection
Just like when setting up the PLCSIM machine, we should ping the virtual PLC from the WinCC VM. If the PLC is responding then we’re good to go! If it isn’t, then check from the Host machine again (and also check you have the VM running, easy mistake!) and check Network adaptors for the VM.
Checking WinCC Connectivity
Even if you can ping the virtual PLC, it doesn’t mean that WinCC is actually able to communicate with it. It’s almost guaranteed that even though you have successfully networked your VMs, Host and PLC together, that WinCC will say that it cannot reach the PLC…
Whilst frustrating, this is because of 1 simple fact… WinCC does not know that it is a Virtual PLC, we are not using the PLCSIM protocols to talk to the PLC, which are less secure. Because we’re using normal communication, we need to satisfy the standard requirements:
- PG/PC interface is configured correctly in control panel
- WinCC connection adaptor is configured to use the correct PG/PC interface
- PLC Communication Certificate has been added to WinCC
The last one is a new requirement as of later versions of S7 PLCs. WinCC will require certification to communicate with the PLC. This is easily obtained by performing an AS-Read or using the SIMATIC Export Tool
Setting The PG/PC Interface

The Set PG/PC Interface can be found in the Control Panel of the WinCC Virtual Machine (Head to “All Control Panel Items”)
The image above shows the Access Point of the Application is set as S7ONLINE (STEP 7) and is connected to the Intel(R) PRO/1000 MT Desktop Adaptor. This is the ethernet port of the VM. We should NOT be using PLCSIM, despite using PLCSIM Advanced for the PLC.
In the window that allows selection of different interfaces, you’ll notice that the same adaptor appears more than once. This is because there are different “modes” that the interface can operate in. In nearly all cases, you’ll want the one that has TCPIP.Auto at the end. Ignore the warning about connectivity through a router as we’re not making use of that.
Click “OK” to set the interface and this bit is now done.
Setting The WinCC Connection Adaptor
Open the WinCC Explorer (this is WinCC that we installed earlier) and if you don’t already have a project to open, you may need to create a new project as mentioned earlier.
Once your project is open, open the Tag Management console. On the left hand side, in the Tag Management pane, a connection driver called SIMATIC S7-1200, S7-1500 Channel should exist. If it doesn’t you can create it by right clicking on Tag Management and choosing Add Driver and selecting it from the list
In the OMS+ section of the driver, right-click and choose New Connection. If you already have a connection here in an existing project, then you don’t need to do this bit, just use that connection instead.
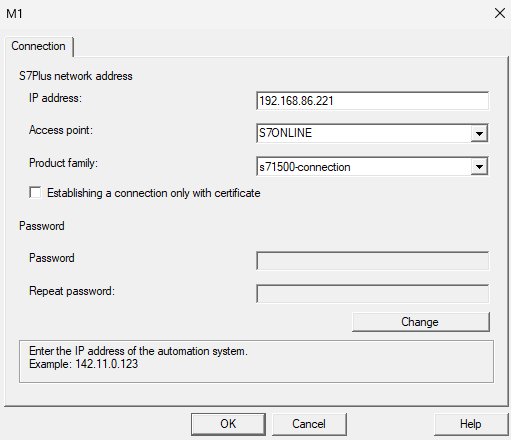
Open the Connection Properties (by right-clicking) of the connection. It’ll look like the image above.
- Ensure that the IP Address is that of your Virtual PLC
- The Access Point is set to the same one used in the PG/PC Interface
- Product Family is set to S7-1500
Click OK and the connection should be complete, but it won’t establish a runtime connection yet…
Assigning The WinCC <–> PLC Certificate

Siemens enforce that communications between PLCs and other devices must be secure, including SCADA. Whilst there are ways to turn this off / circumvent the requirement, it’s actually a good thing and it should be done.
The easiest way to do this is to use a tool called SIMATIC SCADA Export. This needs to be downloaded (and is dependent upon your TIA Portal version) and installed. You can download the version for V20 here: https://support.industry.siemens.com/cs/document/109748955/simatic-scada-export-for-tia-portal?dti=0&lc=en-GB
Once installed, a new menu item on the right-click menu is available in TIA Portal. Make sure you are ONLINE to the PLC.

By right-clicking on the PLC item and choosing Export to SIMATIC SCADA, a dialog will appear:

From here, select the path in which you want the Zip file to be saved to and the PLC(s) you want to export.
The tool will create an Automation System file for each PLC, stored within the Zip. The file contains all accessible tags (instance and global) and certificates for communication.
Once the Zip file has been created, move this to your Virtual Machine (the one that is running SCADA).
📝Note
There are many different ways to move files to VMs. Most commonly, you can drag and drop or copy/paste. Sometimes this doesn’t work though. If this refuses to work for you, check this video out:
Once the Export Zip is available in the VM, open WinCC Explorer and the Tag Manager

Choose AS Symbols –> Load From File. Locate the Zip file (you may have to change the file type if it’s the first time you’ve ever done it) and load it into WinCC. This could take some time.
A dialogue may appear asking to accept certificates (and potentially discarding ones already used). Accept the certificates and (if you are in Runtime) the communication should start working. This is indicated by a green tick on the PLC

📝Note
If this is the first time you’ve ever used the AS system in WinCC, you need to now select your tags you want to read. You can do this by selecting your Data Blocks from the Symbols pane and then ticking the Access checkbox for structures / tags you want to read.
This is far easier than typing in the DB offsets!
At this point, you should now have working communication between your Virtual PLC and your WinCC SCADA VM.
Final Checks

It’s a good idea to check that things are working as expected:
- In the Tag Management of WinCC we should be able to see that the connection to our PLC is ticked as pictured above and that the Quality Code of tags (you may need to unhide this column) shows Good – OK, which means that the communication is reading tag data correctly
- In the Host Machine (your main machine running the VMs), TIA Portal should be able to go online to the Virtual PLC.
If the above two checks pass, then your environment is set up correctly and you can now set about developing / testing in a local environment without having the need for any hardware!
Don’t worry if the first time you do this it takes a while with some hurdles. I suggest that you make notes of what you’ve done, any issues you encounter and how you overcame them so the next time you need to set this environment up, it’s much more straightforward.
Advanced VPN Setups

An add-on to this local setup is one where your WinCC and PLC VMs reside on a local server (in an office for example) but your TIA Portal instance is on your laptop and remote from the VM server.
This is completely achievable and is how I regularly have my systems set up. As the image above suggests, a VPN is required between your laptop and your server. But once configured the VPN can give access directly to the Virtual PLC for TIA Portal and local access between WinCC and the Virtual PLC is managed in the same way the local configuration is completed.
This method has some serious advantages, especially when it comes to parallel testing / fixing of issues. Using the VPN, local & server VMs, environments such as the one pictured below can be configured:

This approach allows for additional WinCC instances to be created locally and then attached to the Virtual PLC via the VPN gateway. This means that I can have a local copy for updating whilst testing continues on the server VM, and then (via GIT usually) new versions are pushed to the server for updating.
The local instance can be discarded without worry of effecting the testing environment on the server and without interrupting the testing taking place. Of course, the common resource is the PLC, so testing sequences etc does have some overlap.
Final Thought
What really makes this system shine is the configuration of the Project in the PLC. It is important to note that the projects that I design have a full simulation layer, meaning I can simulate all inputs to the PLC via a dedicated soft HMI.
I can only do this because of the Asset Oriented Programming approach taken in my projects and the time spent building structure into my designs.
Below are some resources to help make this more clear as to why this might be needed if you want to simulate everything with no hardware:
Need Help?
If you need any help, leave a comment below, or connect with me on LinkedIn. Always happy to help!
Check in the VM firewall rules for connect host / VM this caught me out for sometime
This is a good tip!!