Latches are an important part of PLC programming, they allow you to leave something in a state of Persistence, even after the initial trigger event has passed.
These come in handy for a whole host of reasons, from interlocking through to status reporting.
Supplied Methods Of Latching
Nearly all PLCs have “supplied methods” for latching, whether in the form of a Function / Instruction such as the SR / RS functions, or even more simply by using a Set Coil and Reset Coil.
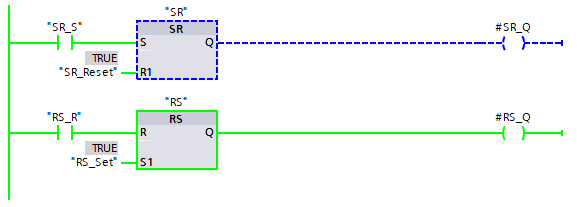
SR Instruction

SR instruction for setting a LatchThe above example shows how the
SR instruction is used to maintain the output state at the Q interface, despite the fact that the input at S is now False.The only way to now reset the SR_Q variable to False is to set the SR_Reset variable to True, which would clear the Q output back to False.
There is also an RS instruction, which essentially does the same thing, but the output result of both inputs being True is inverse to the SR.
True📝Note
Personally, I very much dislike this approach! I feel that constructing latches yourself is a cleaner and more visible way to show that something is latched. I also dislike the way this feels like a Function Block with an instance, but it isn’t, the SR variable is just a normal Boolean value.
Set / Reset Coils
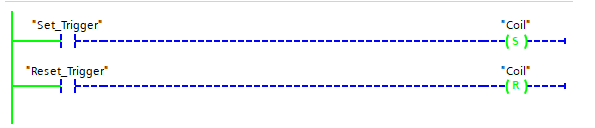
The above image shows that the Coil variable is currently True. The only way this could have happened is for the Set_Trigger to have been True at some point previously. The PLC is then holding the Coil variable as True until the Reset Coil receives a preceding True value.
This short video shows how Set and Reset coils work together. Notice that when BOTH coils are receiving True values that the latter one “wins”, but only from that point onwards. If you slotted code between the Set and Reset coils, the value at Coil would be True
Manual Latching
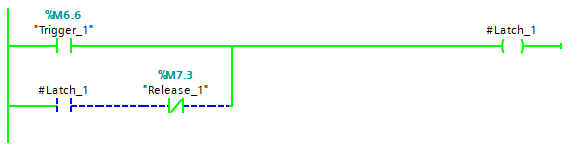
This is my preferred method of latching, the good old “Do it yourself” approach!

This approach consists of a Latch variable that feeds its own Coil (not a Set Coil, a normal Coil). There is an inline Release variable in the latching logic so that the Latch can be released.
The Trigger variable initially sets the Latch to True, but on the next scan of the PLC, the Latch variable sets itself to True through the pathway of Latch and Release, so the Trigger variable can become False again and the Latch variable will remain True.
Once the Release variable becomes True, the latching logic is broken and the Latch variable is set to False again.
If both the Trigger and Release are True, the Latch is True because the Trigger has no other instructions between it and the Latch. This is essentially the same way the RS instruction is working.
Why Manual Latching Over Supplied Methods?
This is a controversial topic for many PLC developers (especially older generations, sorry to say!), but Set Coils are a huge huge pain the ass when it comes to debugging.
The reason why is actually quite simple. You can have multiple Set Coils and multiple Reset Coils in a project that all look at the same variable. Between each instance of a Set Coil and Reset Coil, the value will be True. Between each instance of a Reset Coil and a Set Coil, the value will be False.
This is fine, but can still start to feel a little complicated if there are many of them. Now start introducing multiple layers of Function Blocks and pointers (InOut interfaces) or even global calls to the Set Coil variable and things can get really messy.
This is because whilst trying to debug, you don’t know which Set Coil was triggered to set the variable to True.
By keeping things simplified by only using a normal Coil and only using 1 (you wouldn’t want to use more than 1 anyway!), you can always guarantee you know exactly where the logic is being set. You can see all of your triggers in one place, and all of the reset conditions too.
Common Latching Mistakes
There are plenty of ways in which latching a Boolean can bite you later, but the most common form of incorrect latch usage is simply over-use of them, especially Set/Reset Coils!!
Over Use Of Set/Reset – Across Multiple Layers!

The above timeline diagram shows a “Common Asset” that is operated by a digital output signal. There are 3 functions that are using Set/Reset Coils in order to operate the output directly.
What this diagram attempts to demonstrate is how messy managing an output from multiple Set/Reset Coils can be. As the timeline moves to the right, we can see that Function 1 turns the output on, but Function 2 later turns it off, only for Function 1 to turn it back on. Later Function 3 attempts to turn the output on, but it is already on because of Function 1‘s set coil.
A small flurry of activity then occurs which has all 3 functions setting and resetting the output.
What this is an example of is a poor programming approach that is difficult to follow, debug and scale. You don’t even need to see the logic to know that having things turned on and off across different areas of the PLC will be difficult to debug!
Following a “Request” approach would make far more sense, where each function latches a dedicated Boolean that is then evaluated as an OR before writing out to the output.
This approach can be illustrated like so:
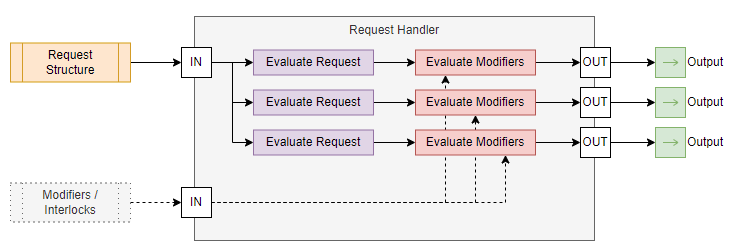
However in this case, there is only 1 output.
📝Note
Are you a Do & Grow Member? If so, check out this tip from a previous scenario that explains this concept in a little more detail
[membership level=”-1″]
😔
It looks like you aren’t a member yet… There’s lots to learn and extra tips and tricks included
Use the buttons below to find out more!
[/membership]
Scope Errors
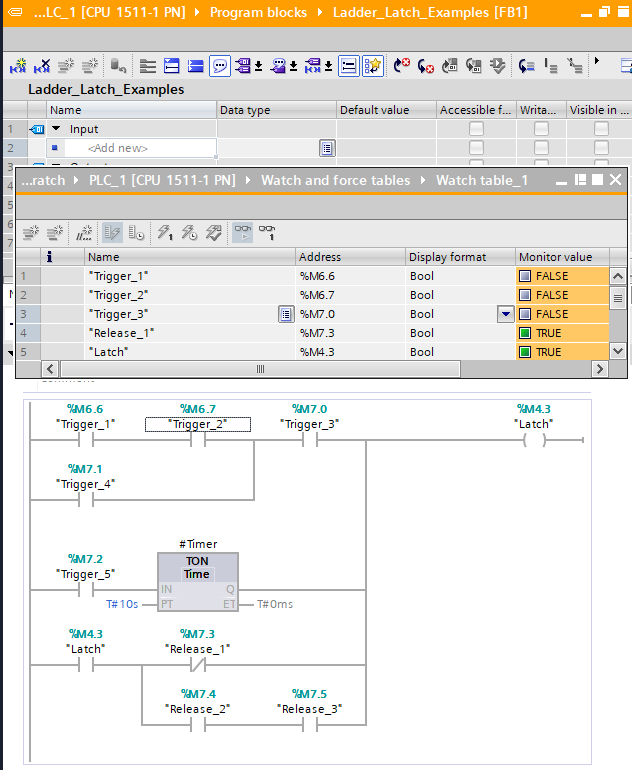
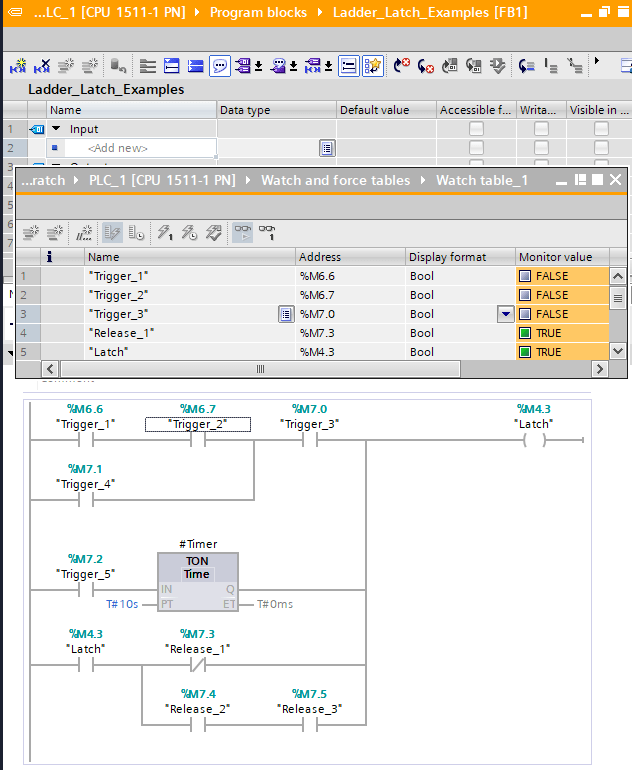
It’s so easy to accidently define the Latch as a “Temporary” variable! When this happens, the latch won’t work at all because the Latch variable is reset every scan.
The image above shows that although Latch_1 is set by Trigger_1, the evaluation on the latching branch below shows it as False. This is because it is a temporary scope and the Ladder Logic scans left to right, so by the time Latch_1 is set to True, the evaluation has already taken place and is False
⚠️ImportantLatch_1 could actually be set to True in the example above, without Trigger_1 being active!!
This is because when a Temp variable is evaluated before a write command is sent, it could have data left in it from a different function.
A good rule is to Always initialize Temp variables with a value before using them
The “Accidental” Latch
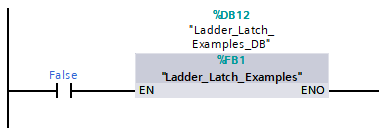
If you disable a Function Block, the internal data is “Frozen” at its last known values. It is common amongst beginners to assume that when a Function Block’s EN value is set to False, that all outputs are set to False, similarly, any Coils (normal ones) will be set to False.
However, this is not the case! Because no logic execution is taking place, outputs, coils, Set/Reset coils… all of it will stay at its last known value. If these variables (especially instance data!) are used later on in the project, with no where else to update them, there’s a good chance that you’ve created yourself a latching system inadvertently!
The example above shows that Release_1 is TRUE, meaning the latch should be broken. Because the FB is not being scanned though, and nothing else is writing to the Latch variable, the latch remains intact.
Other Considerations
Different languages operate in different ways too, for example, SCL treats all assignments as a Set Coil when the True constant is used:

Without a corresponding False assignment, the variable would remain True. This is no different to the Set/Reset Coils in Ladder Logic.
A manual latch looks a little different in SCL:

Note that the above approach is the same as the Ladder approach in terms of logic, it is just laid out slightly differently. We are still evaluating the Latch variable in order to see if it should hold itself on. The initial trigger still needs to come from Trigger_1 and Trigger_2 both being TRUE at the same time.
Check Out Another Post

Siemens TIA Portal V17 – Firmware ≥2.9 & WinCC 7.5 SP2 – No Communication
Hi everyone, This is an informal post detailing some issues that I experienced yesterday with TIA Portal V17 and an…