
What Is A Data Unit Type (DUT)?
A DUT is a special object that allows the definition of a Structure. A Structure works in the same way as a standard data type (such as Bool or Real) and allows variables to be defined as a type of a structure.
DUTs are defined in by using the following declaration.
TYPE <NAME>:
STRUCT

    <VARIABLE:TYPE>
    <VARIABLE:TYPE>

END_STRUCT
END_TYPE
The above would define a structure with 2 variables, defined in the usual method of <NAME>:<Type>;
These definitions would then be available through the defined structure, using the variable name that is defined as a structure and then the variable within the structure.
<STRUCTURE VARIABLE>.<INNER VARIABLE>
Defining and Using DUTs
TYPE Thermostat:
STRUCT

	Current_Temp:REAL;
	Setpoint_Temp:REAL;

END_STRUCT
END_TYPE
The above code would define a DUT called Thermostat, the code should be placed in a DUT object under the Application object.
Once the DUT has been configured as above, you can define a variable as the structure type anywhere in your application.
Var_Global

	Controller 1:Thermostat:=(Setpoint_Temp:=21);

End_Var
In the above example, the Controller1 is defined as a Thermostat (the DUT made earlier). It’s defined in a Global variable space, so it’s accessible anywhere in the program.
Data can be read and written from Controller1 using the following as the variable name.
Controller1.Current_Temp:= 0;This would set Controller1.Current_Temp to 0 (using structured text). This variable can then be read elsewhere with the same variable of Controller1.Current_Temp.
CoDeSys Guide
Lets build the above example in CoDeSys and run it using the simulator. This will give a working example of a structure that can then be expanded on in the future.
Step 1 – Create The DUT Object
Firstly, ensure you are using a project that has a device added to it and an Application object.
- Right Click Application and choose Add Object and then DUT…
- Name the DUT “Thermostat” and choose the STRUCTURE option
- Open the new Thermostat DUT
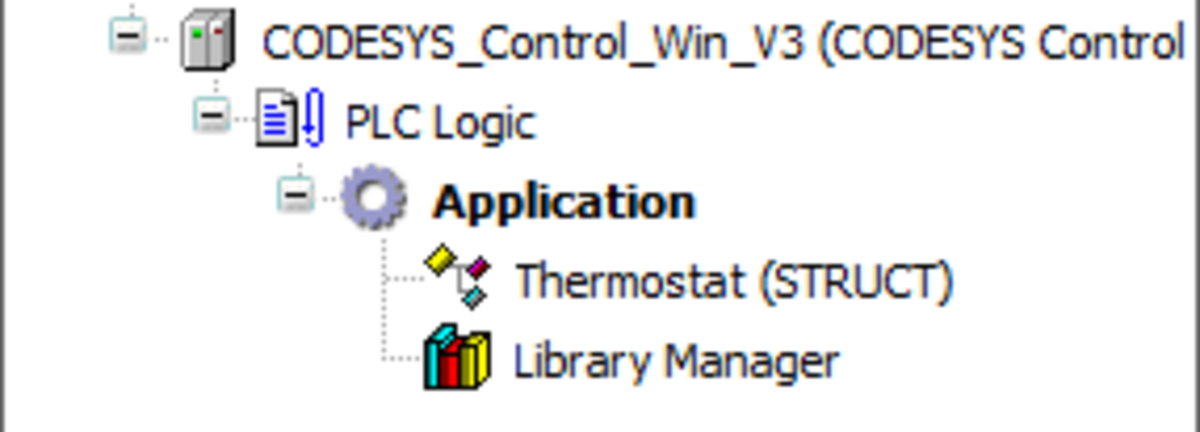
Your navigation pane should look like the following by this point.

Step 2 – Defining The Structure
In the opened Thermostat DUT, write the following code.
TYPE Thermostat :
STRUCT
	Status_CurrentTemperature:REAL;

	Control_TargetTemperature:REAL;
	Control_Enabled:BOOL;
	Control_HeaterOutput:BOOL;

	Param_Deadband:REAL;
END_STRUCT
END_TYPE
There’s a few more variables than previous examples, but they’ll be used later in the code.
Now the structure is defined, we can go ahead and start using it.
Step 3 – Using The Structure
We need to define a variable that is the Thermostat type. We’ll do that in the POU in which the Thermostat structure is needed.
- Create a new POU with the following configuration:, Name: Heating, Type: Program, Language: Ladder
- Between Var and Var_End add Controller1:Thermostat;
PROGRAM Heating
VAR
	Controller1:Thermostat;
END_VAR
Create the following ladder logic, using the Controller1 variable that has just been defined.

For those on mobile or cannot see the image, here’s a text base version to follow.
Contact: Controller1.Control_Enabled
Box: LT (Less Than – Parameter1 = Controller1.Status_CurrentTemperature, Parameter 2 = Controller1.Control_SetpointTemperature – Controller1.Param_Deadband)
Coil: Controller1.Control_HeaterOutput
Add a Task Configuration to your Application and in Tasks add the POU Heating.
Build your application and ensure you have no errors. If you do have errors, go back and follow the previous steps again and see where you’ve gone wrong.
Step 4 – Initialise Variable
As with any variable, initial values should be given if being used in a controlling process.
In the declaration of Controller1, change Controller1:Thermostat; to the following.
Controller1:Thermostat := (Control_TargetTemperature := 21, Param_Deadband := 0.5);This will ensure that Controller1.Param_DeadBand & Controller1.Control_TargetTemperature are initialised with values when your application starts for the first time.
Step 5 – Simulate
Now we’re ready to run the application and make sure everything works as expected.
Login to the PLC (by clicking Online >> Login) Make sure your in simulate mode. Download your application to the simulated PLC.
Click Start, you should be seeing the below image.

- Control_Enabled = False
- Status_CurrentTemperature = False
- Control_TargetTemperature = 21
- Param_DeadBand = 0.5
- Control.HeaterOutput = False
Double click on Controller1.Current_Temperature and change the value to 15. Press Ctrl + F7 to download the new value to the PLC.
Double click on Controller1.Control_Enable and download a TRUE value to the PLC
Note that the Controller1.Control_HeaterOutput coil is now active.
In the Declaration pane (above the ladder logic) there is now a table with 1 entry – Controller1. Expand the variable and view the Structure variables of Controller1. These variables are the variables that are being used in the ladder logic, you can also manipulate them here.
Expanding DUT Usage
DUTs can be extremely complicated, but also extremely useful. To make better use of them, you could consider the following.
- Use DUTs with Function Blocks and pass an entire structure as an input to the function block instead of many individual variables.
- Build DUTs for common instrumentation used, such as pressure, temperature etc. You can pack these into a library and use them over and over.
- DUTs can be defined as Arrays also: Controller: Array [0..99] of Thermostat would create 100 thermostat structures, accessible via Controller[X], where X = the number controller you wish to access variables of.
Check Out Another Post

Siemens TIA Portal – Predefined Variables
Predefined Variables are a great way to populate interface data with regularly used information The video below teaches you the…