
Git is a revision control and management tool that helps developers keep track of changes in a development environment. It can also be used to create development branches, manage releases, track errors and more.
If you are reading this post, chances are you looking for a way to manage PLC revisions / modifications using Git. I personally use Git, and this post explains how I use it with Siemens TIA Portal and other IDE’s to keep on top of where I am with my projects and keep things safe.
The key thing about Git is that it tracks individual file changes, not the entire project. This means if you have 100 files in a Git repo and you modify 6 of them, only the 6 are updated in the repository. Git then manages all the changes since the repository was started. If you need to roll back, it only changes the files required to do so.
📝Note
This guide uses the Bash terminal window. We won’t be using a graphical environment because Git is so much easier to use in a terminal window. I know it doesn’t seem likely, but it is!
🟢Getting Started With Git
Before you jump in, there are a few things you need to do to prepare for Git.
📦Install Git
- Head over to GitHub – https://github.com/git-guides/install-git
- Here you’ll find how to install Git for your environment
- Whilst installing Git, leave all the options as default. Whilst you are getting started, you won’t really need to explore any of the wider options.
- Following the install, ensure that when you right-click in a folder, you can see the following option

- Note – In windows 11, you need to click “Show More Options” to see these!
- Note – In windows 11, you need to click “Show More Options” to see these!
- Once you can see the above, Git is installed.
👤Create GitHub User Account
Head back to github.com and create an account. You’ll need this if you plan on pushing your projects to the cloud for storage (You can create a private project, so it’s not shared with anyone you don’t want to share it with!)
Once you’ve created an account and have GIT installed, you have everything you need to start!
💻Creating Your First Repository
There are two repository types:
- Local
- This is your local, offline repository. It resides on your PC / Laptop.
- This is the repository you’ll work out of the most
- Remote
- This is the cloud version of the repository. It syncs with offline repositories keeping them up to date with the latest version, or being updated by them.
- Remote repositories can be used to allow more than 1 user to work with the same project, syncing each others changes, or even merging them if the file types allow it (PLCs generally don’t!)
We’ll want to be creating a LOCAL Repository for now, so we can see how this works. In the future we’ll do it slightly differently, starting with the REMOTE because it’s so much easier! But, it’s a good idea to understand the basics first.
🏠Creating A Local Repository
To do this, first navigate to the folder you want to create the Git repository inside. The folder must be empty!
1️⃣ – Open The Bash Terminal
Right Click in the folder and choose “GIT Bash Here”. The following window will open:
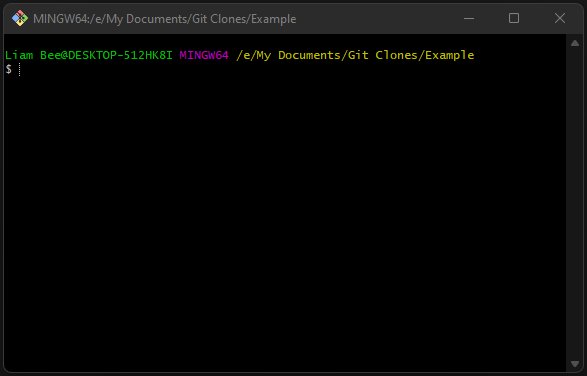
Notice that the path (in Yellow) shows which folder we are working in.
2️⃣ – Initialize A Local Repository
This is easily completed with the following command:
git initThis initializes an empty repository in the folder:
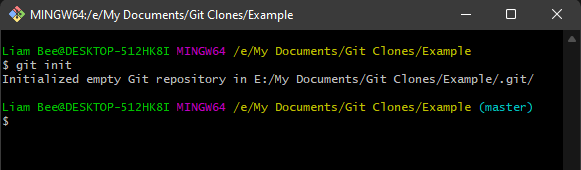
A new hidden folder called .git has been created. In this folder, all of the changes will be tracked. Deleting this folder will remove all history that has been tracked!
At this point, you now have a local repository, ready to track your changes.
⬇️Adding Something To The Repository
The way git works is that it watches the parent directory to the .git folder, monitoring changes, new files and deleted files. Git is smart enough to read the content of text based files and check the difference line by line, modifying the tracked file to only include the inner changes.
When it comes to PLC management, Git can rarely read the contents of the file, so instead works on file size and timestamps.
Let’s create a new file in our repository and see how Git responds:

If we go and check the Git Bash terminal now and run the command git status, we’ll see the following output:
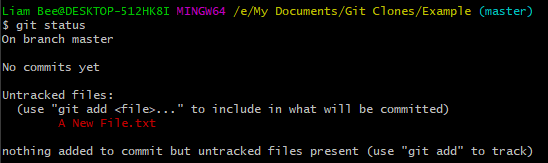
git status outputThis tells us that “A New File.txt” has been added to the local directory, but is not yet being tracked in our local repository. In order to track it, we need to stage & commit it…
✅Staging Files
Before you can commit anything to be tracked in your repository, you need to tell Git that you actually want it to be tracked. This is called Staging, and is done with the following command git stage, followed by an option. You can see the options available by using git stage --help. This will open a local HTML page (pointing you to git add) explaining the options, there are many!
In nearly all cases, especially when working with something like a PLC project, we’ll want to stage everything, so our project stays consistent. Remember that GIT will only stage files that have actually changed.
You can stage everything by using git stage --all
If you follow this up with a git status, you get the following output:
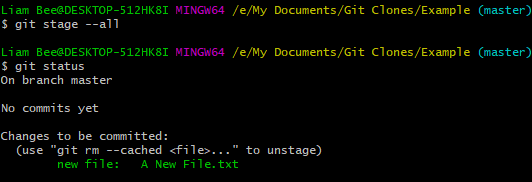
Git stage --allAt this point, we’ve now told git that we want to track changes for everything in the folder, but only files that have actually changed will be staged.
The “A New File.txt” file is now green, prefixed with “new file”. This tells us that git has staged a change in this file, which is the type “new file”. In some graphical representations of Git, this is used to show different icons etc.
📝Note
You can stage individual files and folders by using their name instead of the --all option.
This is useful if when changing 1 file, it causes other files to be affected but the changes are not required to be tracked.
The next step is to commit your change, almost like a confirmation step.
📩Committing Changes
The act of Committing something tells Git to track the change in the local repository. In the case of our “A New File.txt”, this means the entire file will be tracked, with the contents as they are at the time of committing, because it doesn’t exist in the repository right now.
To commit changes, use the command git commit
There are options available for the git commit command, which can be seen by typing git commit --help. This will open a local HTML page explaining the options, there are many!
The most important options is the -m option. This allows you to type a message for the commit, something that you really ought to be doing!
The full command would therefore look like git commit -m "A new text file for our example"
This would have the following output:

git commit -m exampleThe output of this shows that the file has been successfully committed to our local repository.
If we now perform another git status, the following is output:

This means that your working directory is a match with the tracked changes in the .git folder. Git refers to this as being clean
🪵Checking Logs
You can check the history of the repository by using the git log command. This will output a list of the commited changes since the repository was created

git logThis shows a single commit (since we’ve only made 1) with the follwing information
- The
commit ID– This is a long unique ID that refers to this specific commit - The action –
Head -> mastertells us that we made the commit from the head of the repository (the latest position) and committed to themasterbranch (we’ll cover branches later) - Author – Who did the commit
- Date – When the commit happened
- Message – The message sent with the commit.
The git log has many different options for stylizing the output. The one I use most often is:
git log --all --graph --pretty="%C(yellow) %h - %C(white)Date: %ad (%ar)%C(green) - <%an>: %C(white)%s " --date=human
This gives you the output of:

By reducing the size of the entry, using the shortened version of the ID and making dates relative up to a point, it’s far easier to see how the project has developed. This view also draws lines representing Branches if you have more than 1 branch of development:
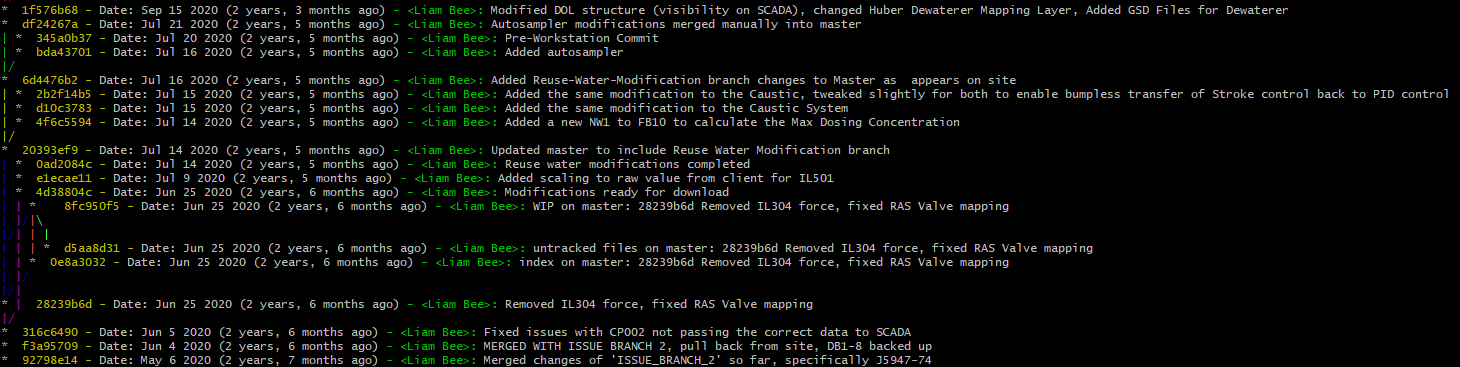
We can see from the above image that the lines track development branches, where I have deviated down a different development path and merged my changes later back into the main branch.
We’ll cover branches more in a moment.
📝Note
You don’t have to write out that entire git log --all --graph --pretty="%C(yellow) %h - %C(white)Date: %ad (%ar)%C(green) - <%an>: %C(white)%s " --date=human command every time. You can create aliases in a special file that allows you to call another command by a shorter name. This is what I do to call the above. You can find out more about this by searching for “Git Aliases”
🎋Branches
Sometimes you need to take your development down a different path and you don’t want to be committing against the repository if you are making lots of changes to a specific area in the project. This is where Branches come it useful
A Branch is already created for you, a master branch. This is what you are committing against if you don’t do anything else with branches in a repository.
➕Creating A New Branch
To create a new branch, simply use the command: git branch <name>, where <name> is replaced with what you call the branch.
For example:

git branchThe above called the git branch command twice, once with the additional option of "M20", to create a new branch. The second call omitted the option of text, so lists the available branches.
We can see that M20 is listed as an available branch.
🔀Switching Branches
You can switch to a different branch at almost any time, as long as the following conditions are met:
- You do not have differences in the branch you are switching to that are newer than the differences in the current branch you are on.
- You are not in the middle of a stage, or merge event.
You can switch branches if the differences in the branch you are currently on are newer than the branch you are switching to, which is useful if you forget to switch until you are ready to commit!
You can switch branches by using the command: git checkout M20, this would give the following output:

git checkoutThe above shows that we’ve now switched from the master branch, to M20
↙️Merging Branches
You can make changes in Branch B, and then when you are ready, merge them into Branch A:

The above shows both the master and M20 receiving changes
c43a900is the base for both sets of changes in master and M20
🔎Checking Differences Before Merging
If we want to see the difference between your current branch and a particular commit, you can use the command git diff master..c4ea900. In this case, this will compare our latest master commit with the first one (that uses the same ID). The output is:
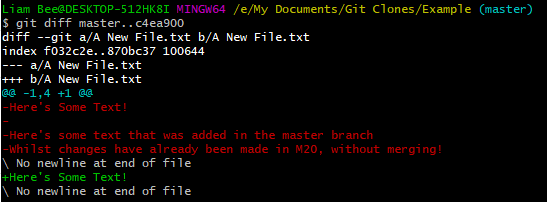
This shows us the file in location A (master) in red, then the file in location B (c4ea900) and you can see the differences.
Sometimes, like in this example, Git thinks a line has been removed and re-added. The Here’s Some Text! has been shown as being deleted and re-added between the files. Usually, if text appears in both, it is white with no symbol before it.
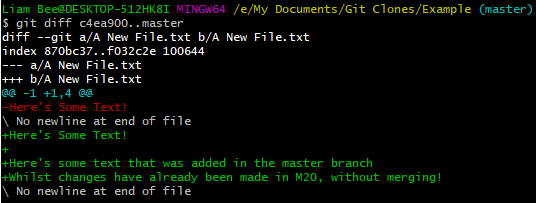
If you swap the position of the references, you get the opposite result:
If we choose to diff the two branches completely with git diff master..M20, we get the following output:
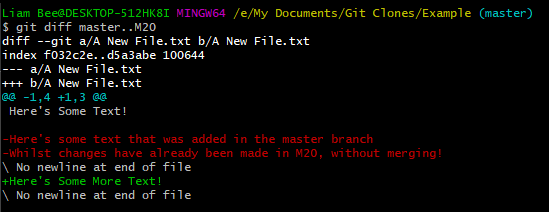
This shows the following:
- “Here’s Some Text!”
- This exists in both files, so there’s no +/- or colouring associated with it
- The red text appears in location A – Master branch
- The green text appears in location B – M20 branch
🔷Merge Event
When it comes to merging, Git will automatically merge where possible. Where it can’t, it will ask you to decide.
Let’s merge the two branches, with this command: git merge M20 whilst on the master branch
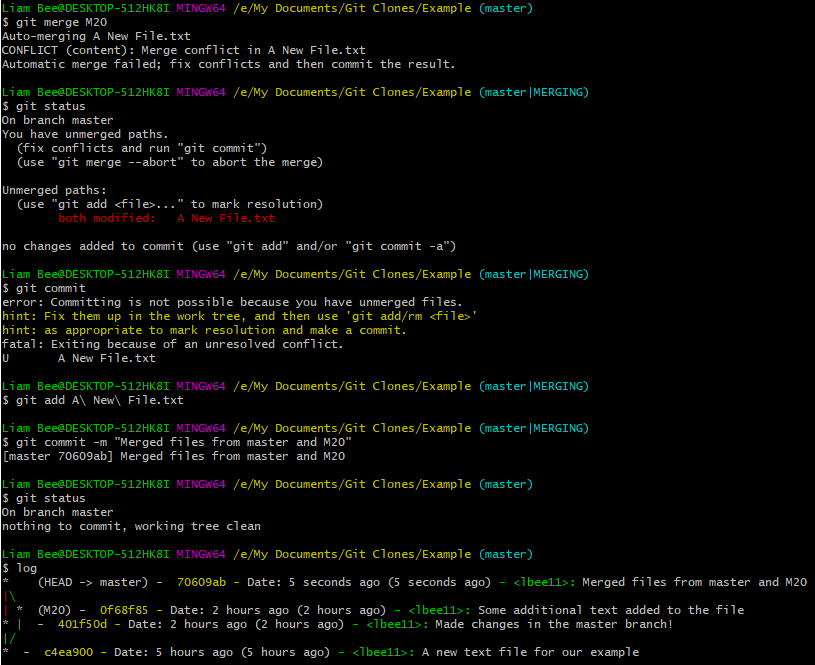
Let’s run through this:
git merge M20– this resulted in a conflict. Git could not tell which file was the correct one to keep, or if we wanted to merge them togethergit status– This showed me the reason why it couldn’t be merged. Both files have since been modified. This is true, both instances of “A New File.txt” have changed since commitc4ea900- Manual Modification Of File – Because this is a text file, I had the opportunity to access the file and remove some placeholders set by git. Git had placed
<<<M20and>>>masterlabels, showing which data was different. By removing both of these and the====between them, this tells Git that I want to keep both texts git add A\ New\ File.txt– Add the new file to the staged areagit commit– committed new merged filegit status– shows that there are no issues
The log at the end shows the merging of the branches
📝Note
If this were a PLC, we wouldn’t be able to manually modify the file. Git would expect us to simply choose which branch wins using the Mine and Theirs options (looking from the branch you are currently creating or moving into’s perspective).
You can read more about this here – https://howchoo.com/git/git-merge-conflicts-rebase-ours-theirs
☁️Remote Repository
You can track a remote repository against your local one, allowing you to Push and Pull between the cloud and your local machine.
In order to use remote repositories, you’ll need to create one on a service such as GitHub.
This is simple enough (click “New Repository” and fill in the options).
There are other services such as BitBucket too, the principles are the same for most services.
🌥️Adding A Remote To Your Local Repo
This can be done with a simple command, but if you forget (like I do!) then simply trying to Push will give you a message telling you what you need to do:
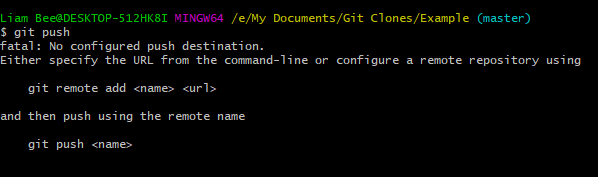
git push to be prompted to add a remote repositoryHere we are told we need to use git remote add <name> <url> in order to add a remote to our local repository.
I have created a repository on GitHub and am told the following information there:

This gives me the URL I need, so I can make my command:
git remote add origin https://github.com/lbee11/GitExample.git
You don’t get an output for a successful link
📝Note
Why the name origin? It’s common for managed git programs to use origin as the name of the remote repository when you’ve pulled from a remote instead of creating one from scratch. For this sake, I name them origin too, so all my repositories are the same
⬆️Git Push
The push command will push the current branch, and all of its history, to the remote repository.
If you haven’t pushed to the remote branch before, there is an additional step:

git push for the first timeWhen using git push for the first time, you’ll be told that you need to set the upstream branch. By using git push --set-upstream origin master you get the following output:
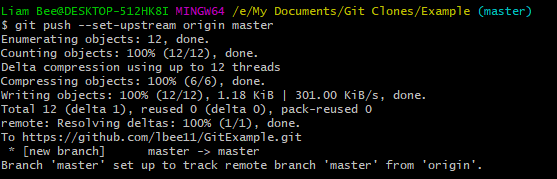
This packs up your local branch and creates a new branch on the remote of the same name. The master -> master shows that the local and remote branches for master are now tracking each other.
The next time you use git push, you won’t need to set the remote upstream branch.
You should really Fetch before you push too, to ensure you don’t end up in a mess where your latest push is not the most recent. See below.
⤵️Git Pull & Git Fetch
Before you Pull, always Fetch – This ensures you don’t get yourself in a mess later!
Git Fetch simply refreshes the remote repository index on your local machine. This means if a colleague has updated the remote repository, on your branch, you are now aware of it. Now you can do a git status and see what’s going to happen before you do the pull!
The same goes for pushing, doing a fetch ensures no-one else has beat you to it and pushed something before you have. If that happens, it can cause a “Push/Pull” scenario that can be tricky to get out of without loss of data somewhere.
If you need to download modifications or changes from a remote repository, open your local equivalent in the terminal window and use git pull. The repository will be updated to the latest commit, which it will automatically checkout if possible.
🛒Git Checkout
git checkout <commit / branch> allows you to manually pick a commit to checkout, or switch a branch.
It’s important to understand that if you checkout an old commit, you become detatched from the timeline, meaning any modifications made (even if saved in your application) will be lost once you checkout something else, even if you commit. You’d need to commit to a new location in order to save the changes.
📝Note
You might want to checkout an old commit to use “Save As” in a PLC project in a new location. Then you could switch back to the current branch and compare the projects.
❇️Git Clone
Cloning allows you to create a local git repository that downloads and links to a remote repository automatically. From the moment a remote is cloned, it is set as the remote repository and the branches already have their upstream branches set.
To clone a remote repository, navigate to the folder you wish to create it in and open the bash terminal. Use the following command: git clone <url> "Name"
For example:

This has now created a local repository in the folder Example 2, that is tied to the remote repository from GitHub. You can new use this in the same way the local ones are used.
🔶Summary
Hopefully this post will help you get started in the world of Git! As always, if you get stuck, get in touch with a comment or message on linkedin!
Check Out Another Post
