
OPC UA is built in to most S7-1500 PLCs, especially those with the latest firmware. Siemens have the “Standard Simatic Interface”, but you can create your own and restrict access to your data further.
In this post, we’ll explore creating both a Server Interface and then use that interface in a Client PLC.
🎯What’s In This Post?
⚙️Configuration Of OPC UA Server Interface

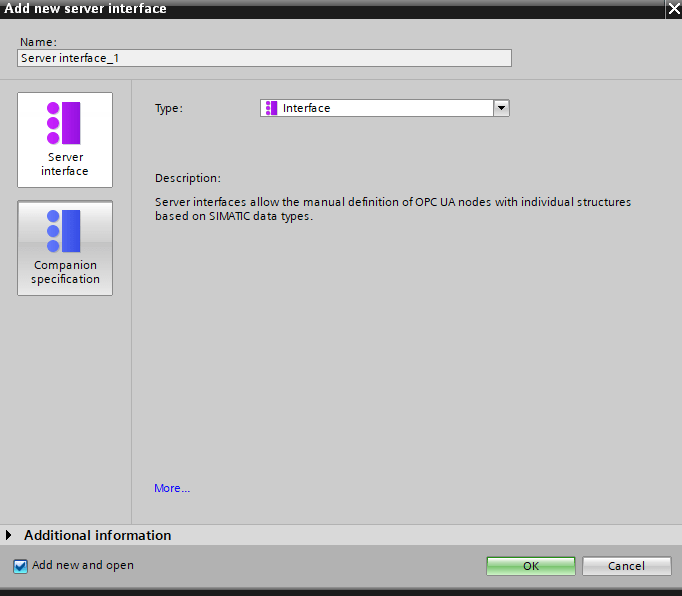
In the PLC in which the data will reside, (in this case our PLC_2), a Server Interface is created. This can be done by opening the OPC US communication section in the project tree, and then the Server Interfaces folder
When clicking the Add new server interface, the above window opens. We want to create an Interface for our client to connect to.
🔷Populating Interface
Once the interface has been created, it will be blank, with no information / data populated within it. We need to then drag the items that we want, from our tags / data blocks, into the interface.

Drag and drop the required tags / data block elements into the OPC UA server interface, as shown above. You can create local data for any tags / variables that do not already have local data.
We can also set the Access Level in the interface. This determines if the client will be able to read / write or both for each element
Once the interface has been completed, we need to compile and download the hardware to the PLC.
At this point, the interface has been loaded into the controller. However, we still need to configure the OPC UA settings and Runtime.
The server interface can be exported by clicking the Export Interface button. We’ll need this for later when we import it into the client.
⚙️Configuration Of OPC UA Client Interface
The OPC UA Client is a device that will access information from an OPC UA Server. In this case, this is PLC_1, and our server is PLC_2.
We’ll be accessing information inside PLC_2 via the interface we created earlier.
Creating the OPC UA Client interface is done via the same method as the server, however we choose the Client Interfaces, instead of the Server interface.

Once the Client interface has been created, we need to import the Server Interface that we exported earlier.
🔷Populate Client Interface

After importing the Server interface, we can drag the entire OPC_Interface object, and all nodes will be added to the Client interface.
We need to drag the interface into both the Read list and Write list.
In our example, we only have a single node – Byte_Array, which is an Array of BYTE with an access level of RD (read)
If we try to add the OPC_Interface to the Write List section, the following message is displayed:

🔌Connection Of Client Interface

- Click Online Access
- Enter OPC UA server address & Find select server
- No certificate or user authentication for this example

- Even if we’re not using one, you must accept the certificate for communication
🧠Client Logic Requirements
In order to actually read from a server, setting up the Client Interface is not enough, we also need to configure some logic to connect and receive information.
You must compile your project before you continue
🔷OPC UA Connect

The first object that we need to use is the OPC_UA_Connect function block.
By clicking the little toolbox button on the top right of the FB, we can use a wizard to update the interface elements (with exception to the REQ)
Select your interface in the drop down list and the wizard will do the rest.
This block needs to have the REQ set to TRUE to initiate a request to the OPC UA Server of PLC_2. But, we need to set the ServerEndpoint URL ourselves in the code first:

The S_Move instruction is used to move a String into the ServerEndpointUrl variable. This is necessary to tell the OPC UA client where the server is located.
When the connection is made, by the REQ being set to True, a Connection Handle is created and output on ConnectionHdl. This is then used throughout the rest of the Client objects to reference the connection.
🔒Additional Tip
[membership level=”4,1″]

If you can’t select your interface, From_PLC2 in our example, you need to compile your entire project. This can be done by right-clicking the PLC in the Project Tree and choosing Compile >> Hardware & Software. You’ll need to be offline to do this
[/membership]
[membership level=”-4,-1″]
⚠️ Membership Required

[pmpro_checkout_button class=”pmpro_btn” level=”4″ text=”Become A Lifetime Gold Member”]
🔒What Am I Missing Here?
A small tip explaining why you may not be able to see an interface in the drop-down list and how to resolve it
[/membership]
🔷OPC UA Namespace List
The next step is to poll the server and ask for all Namespaces that it contains, this is required for hte OPC UA client to browse the available data on the server.
This can be done using the OPC_UA_NamespaceGetIndexList Function Block:

You’ll notice that in the ConnectionHdl input, the same connection handle is used from the connect block earlier.
Again, this block was configured by clicking on the toolbox and selecting the interface again.
🔷OPC UA Handle List
We now need to ask the OPC UA Server to give us a list of available nodes it has on the server.
This is done by using the OPC_UA_NodeGetHandleList:

As with previous OPC UA blocks, the REQ needs to be set to True in order to execute the request.
This particular block has an additional configuration requirement. We need to select the list in which we want to request nodes:

🔷OPC UA Read List
Finally, we are now ready to read data from our Server, into our Client.
This is done by using the OPC_UA_ReadList function block:

Again, with this block, we need to select the list we want to read from. In this example, its called the OPC_Interface.
Once this is complete, we then need to action all of the OPC Nodes in an order, and consider fault scenarios.
➡️Execution Of OPC UA Function Blocks
The order in which the function blocks need to be executed are:
- OPC UA Connect
- OPC UA Namespace Get
- OPC UA Node Handle List
- OPC UA Read List
We need to make the following considerations:
- The REQ input is rising edge for all blocks, including the Read List
- This means that we need to connect once, but then cyclically pulse the REQ for the read list in order to update the data.
- If the connection fails, for any reason, we need a way of restarting it
The above can be done by using a Timer’s ET value and an additional OPC UA block – OPC_UA_ConnectionGetStatus
1️⃣Add Timer

When the ConnectionHdl value equals 0, start the Connection_Timer
2️⃣Use ET Of Timer To Drive Connection Attempts

Connection_Elapsed evaluated to drive REQ InputWhen the Connection_Elapsed value is greater than 15s, start the connection attempt.
This process is repeated for the other steps required in the OPC UA connection process
3️⃣Handle Disconnect

Using the OPC_UA_ConnectionGetStatus, we can get information about the status of the OPC UA connection. The ConnectionStatus variable is compared with the value 2. When the value is 2, the connection has failed and is non-recoverable.
In this situation, the OPC_UA_Disconnect is called to terminate the connection. In the same process, the connection handle is reset to 0 (ConnectionHdl)
This causes the first network to re-initialize the connection timer:

At this point, the server should reconnect.
4️⃣ Read the data
Using the Read List block, the data can now be read cyclically by pulsing the REQ input
The data appears in a Data Block that had the same name as the client interface, under the variables structure

This information, Byte_Array can be found here and either used directly, or moved to a more applicable place in your project.
🔒Activating The Server / Client & Runtime Licences
[membership level=”4,1″]

The OPC UA Client needs to be activated in your Client PLC. This can be done in the OPC UA > Client settings on the device
You’ll also need to do the same for the Server in your Server PLC:

In addition to this, you may want to disable security for testing purposes:


In addition to all of the above, you’ll also need to set the Runtime License
Note: You are actually supposed to purchase a license before this goes into an actual product!

Each PLC will require a licence, whether its a server or a client!
[/membership]
[membership level=”-4,-1″]
⚠️ Membership Required
[pmpro_checkout_button class=”pmpro_btn” level=”4″ text=”Become A Lifetime Gold Member”]
🔒What Am I Missing Here?
How to activate the OPC UA Server And Client in the configuration settings of the device. Also, how to set the Runtime licence
[/membership]
🔒File Download
[membership level=”4,1″]
[/membership]
[membership level=”-4,-1″]
⚠️ Membership Required
[pmpro_checkout_button class=”pmpro_btn” level=”4″ text=”Become A Lifetime Gold Member”]
🔒What Am I Missing Here?
File Download for TIA Portal V17 Project Example and associated PLCSIM Advanced files
[/membership]