
Pointers are a great way to manage large data sets or subsections of structures where symbolic allocation to the data is not possible.
Pointers are made up using pointer constructs, these are symbolic references that tell TIA where the data starts and how long the data set is:

The example above shows the pointer P#DB1.DBX0.0 WORD 1.
The following elements make up a pointer:
P#– Pointer identifierDB1– Start Data block / memory area.DBX0.0– Start offset within the data blockWORD 1– Length of the data to be included in the pointer
Pointers do not “contain” data, they point to it. This means that a reference to data is created and TIA works with the original data that the pointer refers to.
When using a Pointer to move data into a function block, changing the data in the function block will immediately update the reference data outside of the function block.
Be careful with data used in other OBs that interrupt, you need to make sure your Pointer references can’t end up with unsafe or invalid data because a function block was not finished with the data before accessed eslewhere
Automatic (Symbolic) Pointers
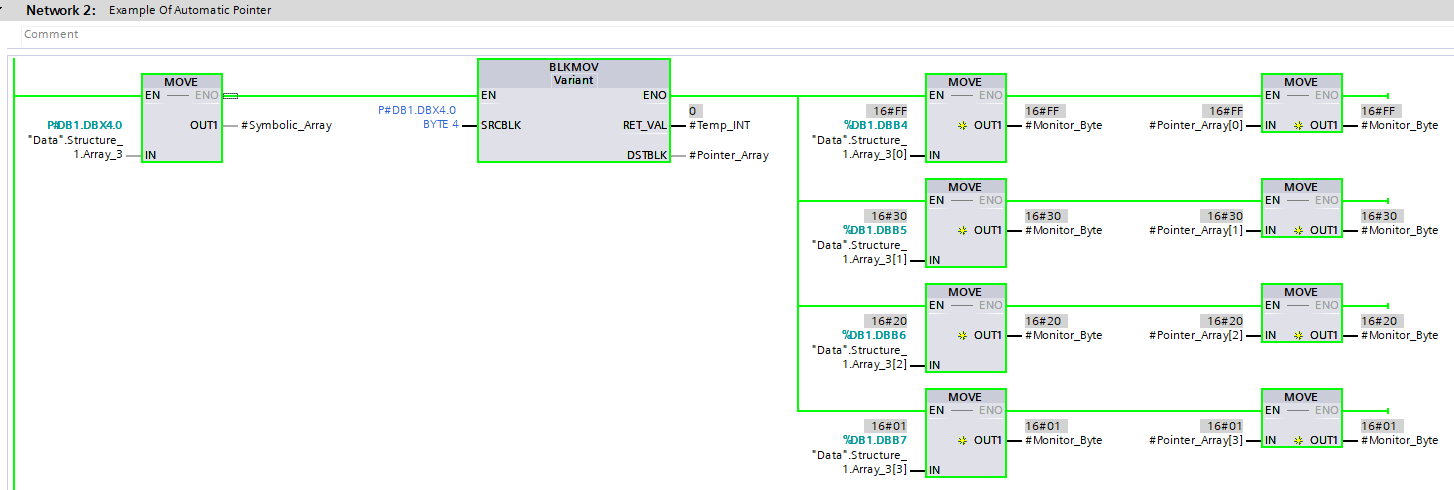
P#DB1.DBX4.0 applied when a complex variable is usedWhen trying to access data that is deemed complex, such as an Array or entire Structure, TIA Portal will actually create a Pointer automatically. You can see this above the symbol.
In the example above, the "Data".Structure_1.Array_3 symbol has the address P#DB1.DBX4.0. Later, on the same network, individual elements of the array are accessed directly. These are “Simple” data types, so can be accessed directly with %DB1.DBB4 for example.
In both cases, whether by an automatically generated pointer or manually generated pointer, the data outcome is the same.
You cannot use MOVE to access pointer data. This is because the Pointer is considered an “Any” data type, which MOVE does not accept. BLKMOV must be used instead, and in order to use that, Optimized Data must be turned off!
Pointers & Data Types
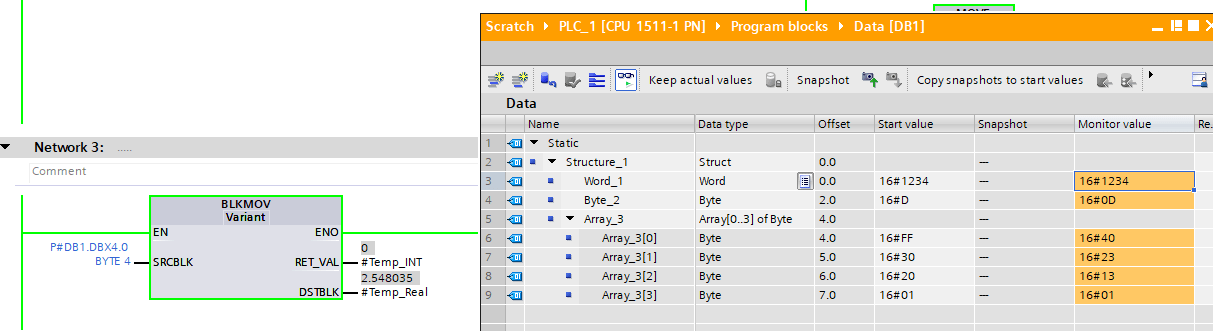
Because pointers have no fixed data type, utilizing the instruction BLKMOV allows the data at the pointer to be moved to a different data type.
For example, in the above image, the data at pointer P#DB1.DBX4.0 BYTE 4 is the Array_3 variable. Because the pointer is BYTE 4 long, that runs from offset 4.0 through to 7.0 for a total of 4 bytes. Because a REAL is 4 bytes long too, the memory length is the same and the BLKMOV instruction can place the contents of the pointer into the Temp_Real variable.
If the DSTBLK (the destination point for the BLKMOV) is a data type that is smaller than the pointer, the data will be truncated, but only if that is a valid place to truncate:
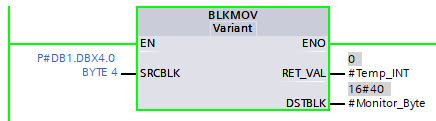
The above shows that although we want to move 4 bytes, only 1 has been moved because Monitor_Byte is only 1 Byte long
Use Case Example
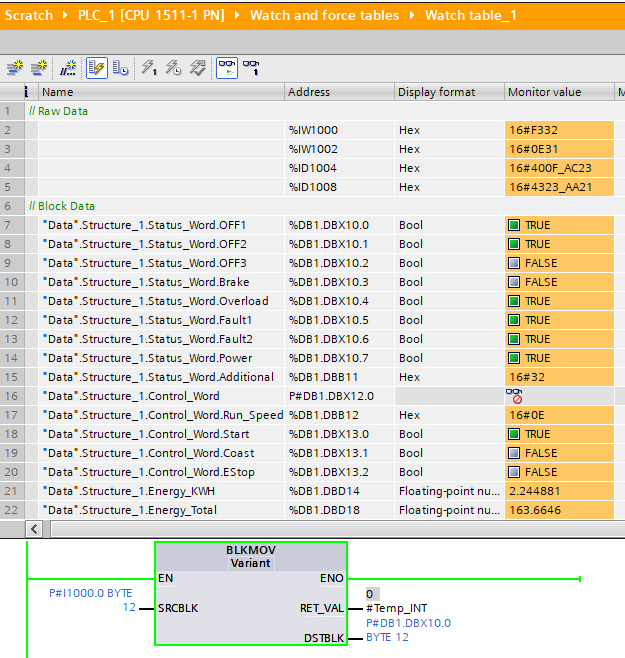
The above example shows the pointer P#I1000.0 BYTE 12 pointing to 12 bytes, starting at Input address 1000. The 12 bytes, 1000 -> 1012 represent a variable speed drive over a network connection. The data is being communicated over these 12 bytes.
In its native format, the drive would deliver the following structure:
WORD– Status WordWORD– Control WordDWORD– Energy kWhDWORD– Energy Daily Total
The data within the Status and Control words is broken down even further.
In a the Data data block, the breakdown of the Status and Control words exists:
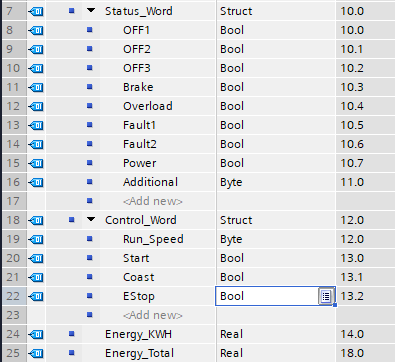
Starting at offset 10, through to 21, for a total of 12 bytes (Don’t forget Energy_Total starts at 18, but is 4 long, so will end at 21 inclusive).
Our total message from the VSD = 12 bytes, and our data block = 12 bytes
Because the data is split between different symbolic elements, a pointer needs to be used to transfer everything to the relative locations. If just "Data".Structure_1.Status_Word was used, the data would be truncated at the end of the word.
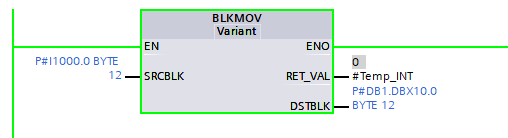
By using P#DB1.DBX10.0 BYTE 12, all 12 bytes from I1000 are being moved to DB1.DBX10. The end result of this, is our control and status words being pushed into more readable and manageable data types:
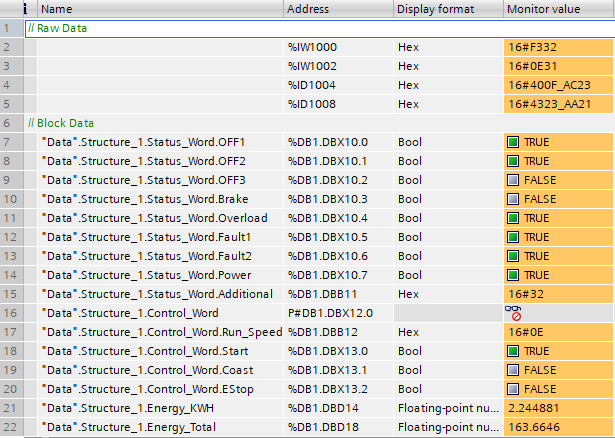
The data is now easier to work with, if we want to check if Fault1 is True, this can be done without having to splice the status word, or take into consideration other values in the status word.